I have set out to learn a bit more about the Google Maps API and how to easily impliment a custom map into Joomla. After looking around quite a bit, I was not able to find anything I could use. What the client wanted was a simple map view showing where his drivers were. The thing about this though, is that they did not want to spend too much $$ on new equipment or GPS fleet tracking software, and he only wanted something simple.
After hours and hours of research and testing, I have found what I think to be the easiest way to impliment multiple KML layers into a single map and I will share my findings with you all too ;) You will need a few things first though, so open up a new browser tab and go install Google Earth if you haven't already. Once you have that, we are ready to get started.

Start by opening up the Google Latitude page, and sign up for a new Google ID per vehicle, biker, etc you want to track, and in Latitude, go ahead and set up a location. Click Privacy Settings, and set that to Detect Your Location. Then tap on the gear in the upper right.
 Once you click the gear, choose Advanced Settings. This will open a new screen showing widget embeding options. At the bottom of that page, you will see a Developer Informaion link, click it. and select the KML link.

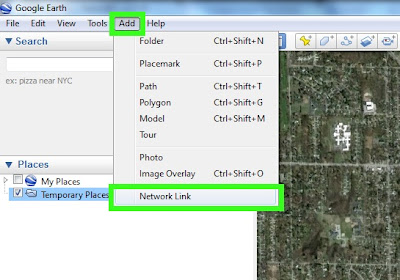
Now we will go into Google Earth and add that link. Across the top, go to Add, and then Network Link.
Then fill out the info for your location and on the Refresh tab, you can set up your refresh options for the location. It should look something like the dialog here.

Next we want to open a normal Google Maps page, and we will set up our route here. Enter in all the stops on the route, and when done, click Get Directions.

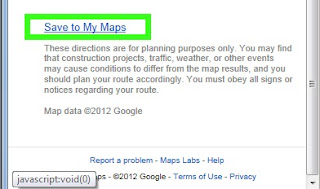 Once finished there, scroll down to the bottom of that left hand colum, and select the Save to My Maps link. Once that opens up, make sure you click the KML link, and save it to your computer somewhere.
We will then open up Google Earth, and open the saved KML file. This will show up in your Map view after imported. Repeat the process how ever many times you need to for trackers and routes, then save the setup as a new KML file by right clicking on the main group, and selecting Save Place As. Then upload the KML file to your server.

Once you have the KML file saved on your server, you will have to create a page to load and show it. Many of the solutions I found online needed a PHP file and an HTML file to function, well I found an easier way for this with just a simple HTML file.
Once you have this set up, save the HTML file on your server, and you can load it in Joomla by making a simple Wrapper Widget, and setting the URL of the widget to be your saved HTML file.
That's about it for this lesson, if I missed anything, let me know ;)
After hours and hours of research and testing, I have found what I think to be the easiest way to impliment multiple KML layers into a single map and I will share my findings with you all too ;) You will need a few things first though, so open up a new browser tab and go install Google Earth if you haven't already. Once you have that, we are ready to get started.


Now we will go into Google Earth and add that link. Across the top, go to Add, and then Network Link.
Then fill out the info for your location and on the Refresh tab, you can set up your refresh options for the location. It should look something like the dialog here.

Next we want to open a normal Google Maps page, and we will set up our route here. Enter in all the stops on the route, and when done, click Get Directions.

 Once finished there, scroll down to the bottom of that left hand colum, and select the Save to My Maps link. Once that opens up, make sure you click the KML link, and save it to your computer somewhere.
We will then open up Google Earth, and open the saved KML file. This will show up in your Map view after imported. Repeat the process how ever many times you need to for trackers and routes, then save the setup as a new KML file by right clicking on the main group, and selecting Save Place As. Then upload the KML file to your server.

Once you have the KML file saved on your server, you will have to create a page to load and show it. Many of the solutions I found online needed a PHP file and an HTML file to function, well I found an easier way for this with just a simple HTML file.
<!DOCTYPE html><html><meta http-equiv="content-type" content="text/html; charset=UTF-8"/><title>Maps Example for loading a single KML file, or multiple KML files. </title><script type="text/javascript" src="http://maps.google.com/maps/api/js?sensor=false"></script><script src="http://ajax.googleapis.com/ajax/libs/jquery/1.5.1/jquery.min.js"></script><script type="text/javascript">$(document).ready(function() {initialize() ;});function initialize() {var myLatlng = new google.maps.LatLng(42.97112, -85.679208);var myOptions = { zoom: 14, center: myLatlng, mapTypeId: google.maps.MapTypeId.TERRAIN}var map = new google.maps.Map(document.getElementById("map_canvas"), myOptions);//Route1 Infovar georssLayerR1 = new google.maps.KmlLayer('http://yourwebsite.com/maps/routes.kml', {preserveViewport: true});georssLayerR1.setMap(map);}</script><body><div id="map_canvas" style="width:100%;height:500px"></div></body></html>
Once you have this set up, save the HTML file on your server, and you can load it in Joomla by making a simple Wrapper Widget, and setting the URL of the widget to be your saved HTML file.
That's about it for this lesson, if I missed anything, let me know ;)
 Since iOS 6 has dropped, the main complaint I am seeing so far deals with the lack of Google Maps and the replacement with Apple's own brew of maps. But the accuracy and inclusion of metro areas has been a bit buggy in some areas, so I'm going to show you how to get a form of Google Maps back on the device.

