Design, Programming, Music and Life

Showing posts with label joomla. Show all posts

Saturday, January 19, 2013

Finished Another Site: OneCraneSource

4:03 PM Posted by Unknown , , , , , , , , No comments


December was quite a month, besides the obvious holiday celebration and preparations, I was also helping out my churches Arts Team and creating a Christmas set to remember. I also was able to finish up a clients website and also optimize the site for best search results, which all worked out beautifully ;)

The client was Star Crane, located in Allendale MI. And this job was a two part deal, first, fix their current mail forms that they had on their site, and second, build them a new site that will help them move into the year 2013, and also be flexible and secure, as well as help promote a better search result.

This site took me about 50 hours to complete from start to finish, and with three designs and four revisions, along with a mobile version to boot, that's not too bad. With that said though, this brings me to a place I'm all too familiar with, looking for more work ;) You can check out some of the screenshots of the design below, or you can head out to http://www.onecranesource.com and check it out for yourself.


Friday, December 14, 2012

How-To - Using Joomla to build mobile Web Apps.


This rough How-To will go through using Joomla to build a simple mobile Web App.

You will need a few things first:

Start off by reading the setup instructs for the YooTheme Warp framework, and set up your pages accordingly. I will sometimes make it so the content of the page doesn't go down too far on the first screen, this will give the users an overall good first impression on a mobile device. Once that is complete, we will set it as the default template. With this design, it automatically detects screen size, but if your client wants a different design for Desktop users, then you can use the MobileJoomla plugin and component to assign a different template to mobile devices. 

Next we will have to download the Add2Home plugin, but don't install it right away. Once you download it, navigate to your download directory and extract the file into a folder. then navigate into the plugin folder, and change the photos there (Unless you absolutely love the ones the developer uses)


Once we are done editing and replacing the graphics, we will then re-archive the files back into a .zip and then we will add the Add2Home plugin to your Joomla extensions. Once it is installed, Just make sure you enable it.

Then it's time to start testing it out and making sure all the content is in the right places. Have fun with it and make it yours :)

Till next time!!


Thursday, November 29, 2012

On to other things - new site design

12:41 PM Posted by Unknown , , , , , , , , , , , , No comments


So I have been working on a new project recently, and this one was a two part project. The first part was making sure that their current site has a working contact form. and the second part is redesigning a new look and feel on top of a Joomla site, so that they can expand in the future with components like an online storefront, or deeply integrate a social marketing campaign into their website.

I took a peek at their current site, and found out that the issues were with the current request mail form, which mind you is written in .PHP, which I kinda hate. I was able to fix the issue though, and got it working perfectly. I know its working perfectly, because the client is now getting SPAMBOT requests :) Too Funny!! But I have them covered already, because the first thing I implemented into the new request form on their new site was a ReCaptcha security method. This should stop the spam from coming through.

I then took my time and started working on a nice responsive theme, but wanted to keep it looking like it was more for their Corporate Office vs a large crane shop. I remade their logo based on some of the feedback they gave me and then used the main colors of their logo and equipment for the highlights of the site. I also used a simple menu system that will adjust to smaller mobile screens and provide a mobile dropdown menu in those cases. Overall, the site is pretty solid so far, with no real issues other than having to rebuild Apache with multibyte strings enabled.

My next stage of this process is to dismantle the site and modules I have now, and rebuild it with a darker, more progressive theme, and after that, another lighter theme, so once they choose from one of those, I will put it all back together with the look and feel of their choice, and then it goes live. I gave the client a timeframe of two months for the project, but the pace I am working, it may only take me three to four weeks, so that's a good thing ;)

Till next time, enjoy your adventures!

Saturday, September 29, 2012

Fun with code: GPS tracking on the cheap

I have set out to learn a bit more about the Google Maps API and how to easily impliment a custom map into Joomla. After looking around quite a bit, I was not able to find anything I could use. What the client wanted was a simple map view showing where his drivers were. The thing about this though, is that they did not want to spend too much $$ on new equipment or GPS fleet tracking software, and he only wanted something simple.

After hours and hours of research and testing, I have found what I think to be the easiest way to impliment multiple KML layers into a single map and I will share my findings with you all too ;) You will need a few things first though, so open up a new browser tab and go install Google Earth if you haven't already. Once you have that, we are ready to get started.


Start by opening up the Google Latitude page, and sign up for a new Google ID per vehicle, biker, etc you want to track, and in Latitude, go ahead and set up a location. Click Privacy Settings, and set that to Detect Your Location. Then tap on the gear in the upper right.
Once you click the gear, choose Advanced Settings. This will open a new screen showing widget embeding options. At the bottom of that page, you will see a Developer Informaion link, click it. and select the KML link.
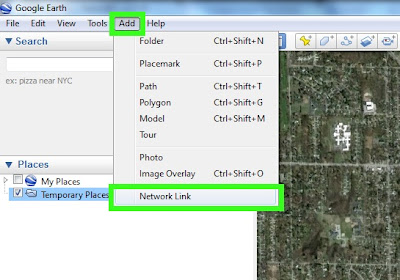

Now we will go into Google Earth and add that link. Across the top, go to Add, and then Network Link.


Then fill out the info for your location and on the Refresh tab, you can set up your refresh options for the location. It should look something like the dialog here.

Next we want to open a normal Google Maps page, and we will set up our route here. Enter in all the stops on the route, and when done, click Get Directions.
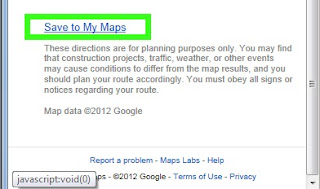
Once finished there, scroll down to the bottom of that left hand colum, and select the Save to My Maps link. Once that opens up, make sure you click the KML link, and save it to your computer somewhere.


We will then open up Google Earth, and open the saved KML file. This will show up in your Map view after imported. Repeat the process how ever many times you need to for trackers and routes, then save the setup as a new KML file by right clicking on the main group, and selecting Save Place As. Then upload the KML file to your server.

Once you have the KML file saved on your server, you will have to create a page to load and show it. Many of the solutions I found online needed a PHP file and an HTML file to function, well I found an easier way for this with just a simple HTML file.

<!DOCTYPE html>
<html>
<meta http-equiv="content-type" content="text/html; charset=UTF-8"/>
<title>Maps Example for loading a single KML file, or multiple KML files. </title>
<script type="text/javascript" src="http://maps.google.com/maps/api/js?sensor=false"></script>
<script src="http://ajax.googleapis.com/ajax/libs/jquery/1.5.1/jquery.min.js"></script>
<script type="text/javascript">
$(document).ready(function() {
initialize() ;
});
function initialize() {
  var myLatlng = new google.maps.LatLng(42.97112, -85.679208);
  var myOptions = { zoom: 14, center: myLatlng, mapTypeId: google.maps.MapTypeId.TERRAIN}
  var map = new google.maps.Map(document.getElementById("map_canvas"), myOptions);
  //Route1 Info
  var georssLayerR1 = new google.maps.KmlLayer('http://yourwebsite.com/maps/routes.kml', {preserveViewport: true});
  georssLayerR1.setMap(map);
}
</script>
<body>
  <div id="map_canvas" style="width:100%;height:500px"></div>
</body>
</html>

Once you have this set up, save the HTML file on your server, and you can load it in Joomla by making a simple Wrapper Widget, and setting the URL of the widget to be your saved HTML file.

That's about it for this lesson, if I missed anything, let me know ;)


Sunday, June 3, 2012

A life on the line

5:07 PM Posted by Unknown , , , , , , , , No comments
I'm trying to make myself remember to post more often, but it doesn't always happen the way I want it. This is also because I am trying to remind myself to stop working and spend more time with my Wife and kids. So it is a double edged sword, so to speak.

On the subject of employment and work, I have been happily helping out a local limo and party bus rental company with a couple websites they run. This job has been running for a couple weeks now, and I'm making a lot of progress on their sites. So far, I have mostly finished fixing all the issues with one site. The only thing left on that is adding a payment feature that somehow ties in to an old, unsupported version of Vacation Rental Script 4 (VRS4). And to make things worse, the PHP for the system has been obfuscated, and there is no record of the key... Well, there is that brick wall... So I have come up with a couple options for this: a) Pass the variable for current_property_rate to another system, like Paypal or Authorize.net, but I would have to set up a second site to handle just that one function, like a simple, but expandable Joomla site with a shopping cart and payment component. Or b) I could put a different custom package into each of the rental property listings that will just shortcut to a paypal or authorize.net payment form, but that will require me to calculate both a downpayment and pay in full number for every property by hand, and continue to do so for each new property. I so wish I could just add a payment function to this site as is. :(

Now that I am thoroughly depressed again, let's move on to some of the positive things I have done with the sites. I started a new Joomla site for the Rental Property site, already finished redoing the logo and designing a template for it. Added slideshow, payment, and rental property organization to the site already, and it will look great once I get the properties in there. But that requires a new expensive component that we are holding off on till I am ready. On the Limo and Partybus rental site, I have already finished building The site and getting 90% of the article info and links into the site. All I have to do on that is format the pages, and move the 100's of photos to a slideshow, sorted by article. On this site, I was able to build a seamless experience from mobile to full desktop browser, with no change in the UI. This is great for them, because it kills two birds with one stone, and saves me some time down the road as well as them some time in the future.

I still have to add up the time I spent on the web sites today, and get that sent out, but I at least got a whole lot of work done on it all this week, despite me being out of commission till Wednesday. I also got to save a friend from a live or death experience too! He had gone and updated his computer to the new Windows 8 release preview, and had lost years of photos in the process, so it was only a matter of time for the poor guy, before his wife would end his life for him, saving him the trouble of having to to do it himself. Me, being the nice guy I am, put my skills to work and was able to recover all the photos plus all of his documents and downloads too. Took me about 15 minutes, so not bad on time consumption. I am glad though that the fix was an easy one and he didn't actually loose everything in the long run. LOL, even though the thought of his wife beating him up is rather amusing.